Battery switch on travel trailer function is crucial for managing your RV’s power. Understanding how to use your battery switch—whether it’s a single, dual, or selector switch—is key to preventing dead batteries and ensuring you have power when you need it. This guide will walk you through everything from basic operation to troubleshooting common problems and performing essential maintenance.
We’ll cover connecting and disconnecting batteries safely, exploring the interaction between your battery switch and other RV systems like solar panels and inverters. Learn how to avoid common mistakes and keep your battery system running smoothly for many happy camping trips.
Understanding Battery Switch Functionality in Travel Trailers
A battery switch is a crucial component in your travel trailer’s electrical system, allowing you to manage and control the power flow from your batteries. Understanding its function and proper operation is essential for preventing electrical problems and ensuring your trailer’s systems work correctly. This information will help you confidently manage your trailer’s power.
The primary purpose of a battery switch in a travel trailer is to isolate and control the flow of power from your house batteries (used for lights, appliances, etc.) to the trailer’s electrical system and potentially to your vehicle’s charging system. This allows you to disconnect the house batteries when not in use, preventing unwanted battery drain and protecting your valuable electronics.
It also provides a means to switch between different battery banks if your setup includes multiple batteries.
Types of Battery Switches
Travel trailers utilize various types of battery switches to manage power. The choice depends on the complexity of your electrical system and your needs. Common types include single, dual, and selector switches. A single switch simply connects or disconnects your house batteries from the trailer’s electrical system. A dual switch allows for the isolation of two separate battery banks.
A selector switch offers more control, allowing you to choose which battery bank powers the trailer or to connect both simultaneously.
Operating a Battery Switch
Proper operation of your battery switch is straightforward but crucial. Before operating the switch, always consult your trailer’s owner’s manual for specific instructions. Generally, the operation involves moving a lever or rotating a knob to different positions. A common configuration includes positions for “Off,” “Battery,” “Both,” and “Start.” “Off” completely disconnects the batteries. “Battery” connects only the house battery bank.
“Both” connects both house and vehicle batteries (if applicable), and “Start” (if available) may directly connect the starting battery to the charging system. Always ensure the switch is in the correct position before using your trailer’s appliances or starting your tow vehicle.
Comparison of Battery Switch Types
| Feature | Single Switch | Dual Switch | Selector Switch |
|---|---|---|---|
| Number of Battery Banks Controlled | One | Two | Two or more (depending on model) |
| Complexity | Simple | Moderate | More complex |
| Control Options | On/Off | On/Off for each bank | Multiple combinations (e.g., Bank 1, Bank 2, Both, Off) |
| Cost | Low | Medium | High |
Connecting and Disconnecting Batteries
Connecting and disconnecting your travel trailer’s batteries involves using the battery switch, a crucial component for managing power and preventing accidental drain. This process is straightforward but requires careful attention to safety procedures. Understanding how to properly connect and disconnect your batteries is essential for maintaining your RV’s electrical system and ensuring safe operation.Properly connecting and disconnecting your house and chassis batteries using a battery switch is vital for managing power in your travel trailer.
This involves understanding the different positions of the switch and the implications of each setting. Incorrect operation can lead to electrical problems or even damage to your batteries. Always consult your RV’s owner’s manual for specific instructions related to your model and battery setup.
Battery Switch Operation
A typical battery switch has several positions. The “off” position disconnects both batteries from the trailer’s electrical system. The “both” position connects both the house and chassis batteries together and to the trailer’s electrical system. The “house” position connects only the house batteries, and the “chassis” position connects only the chassis battery. Before switching positions, ensure the switch is turned to the “off” position to avoid electrical shorts.
Then, carefully rotate the switch to the desired position. Always verify the connection by checking the appropriate circuits.
Maintaining Battery Connections
Preventing corrosion on your battery terminals is crucial for reliable power. Clean your battery terminals regularly using a wire brush and baking soda solution to neutralize any acid buildup. Apply a corrosion inhibitor or dielectric grease to the terminals after cleaning to prevent future corrosion. Keep the battery area clean and dry to minimize the risk of corrosion.
Regularly inspect the connections for looseness or damage, tightening any loose connections as needed.
Safety Precautions
Working with batteries and battery switches involves inherent risks. Always wear safety glasses to protect your eyes from potential splashes of battery acid. Use insulated tools to avoid electrical shocks. Ensure proper ventilation to prevent the buildup of explosive hydrogen gas that batteries can emit. Never smoke or use open flames near batteries.
If you’re unsure about any aspect of this process, consult a qualified RV technician.
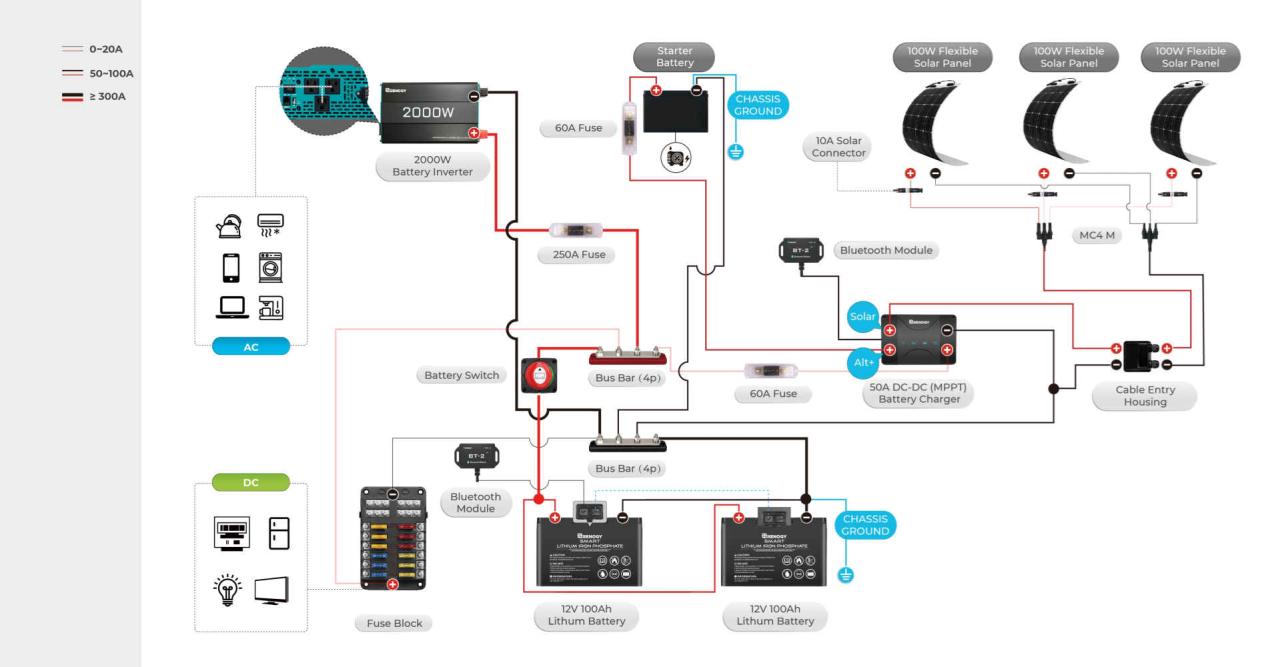
Dual-Battery System Diagram
Imagine a diagram. At the top, you have two batteries labeled “House Battery” and “Chassis Battery.” Each battery has a positive (+) and negative (-) terminal. Below the batteries, you see a battery switch with four positions clearly marked: “Off,” “Both,” “House,” and “Chassis.” From the positive (+) terminal of each battery, a wire runs to the corresponding input on the battery switch.
Similarly, the negative (-) terminals of each battery are connected to the corresponding input on the battery switch. From the switch’s output terminals labeled “House” and “Chassis,” wires run to the respective circuits in your travel trailer. This illustrates how the switch controls the flow of power from each battery to the various systems in your RV.
A ground wire connects the negative terminals of both batteries and the battery switch to the trailer’s chassis ground.
Troubleshooting Common Battery Switch Issues
Dealing with a finicky battery switch in your travel trailer can be frustrating, but understanding the common problems and how to troubleshoot them can save you a lot of headaches (and potentially a dead battery!). This section will walk you through identifying and resolving some of the most frequent issues.Troubleshooting a faulty battery switch often involves a process of elimination.
By systematically checking different components and connections, you can usually pinpoint the source of the problem. Remember to always disconnect the negative battery terminal before working on any electrical components for safety.
Common Battery Switch Problems and Solutions
Let’s tackle some of the most frequently encountered problems with travel trailer battery switches. These issues range from simple connection problems to more complex electrical faults. A methodical approach is key to finding the solution.
- No Power to the Trailer: This is often caused by a faulty switch, corroded connections, a blown fuse, or a problem with the battery itself. Start by checking the fuses both in the switch and in the trailer’s main distribution panel. Then, visually inspect all connections for corrosion or loose wires. Clean any corrosion and tighten loose connections. If the problem persists, test the battery voltage to ensure it’s adequately charged.
So, you’re an audiophile who travels? Awesome! Check out this guide on building an audiophile travel setup for killer sound on the go. It’s all about portability without sacrificing quality. But if you need something a bit more rugged, maybe for those adventurous trips, consider the advice on audiophile travel setup options designed to withstand harsher conditions.
Remember, great sound doesn’t have to stay at home!
If the battery is good and the connections are sound, the switch itself may need replacing.
- Incorrect Switching: The battery switch might not be correctly selecting the appropriate power source (house batteries or truck batteries). This usually points to a problem with the switch mechanism itself. Try switching multiple times, ensuring the switch is firmly in the desired position. If the problem continues, it might be necessary to carefully inspect the internal components of the switch or replace it.
- Intermittent Power: Intermittent power suggests a loose connection somewhere in the circuit. Carefully examine all wiring connections, paying attention to any that seem particularly vulnerable to vibration or movement. A faulty switch can also cause intermittent power issues, so that should be considered if other connections appear sound.
Battery Drain with Switch Off
Even with the battery switch turned off, you might still experience battery drain. This is often due to parasitic draws—small amounts of current being drawn constantly by devices even when turned off. These draws can add up over time, eventually draining your battery.
- Identifying Parasitic Drains: Use a multimeter to measure the current draw at the battery terminals with the switch OFF. A small draw (less than 50 milliamps) is usually acceptable. However, significantly higher readings indicate a parasitic drain. To pinpoint the culprit, systematically disconnect circuits (like the refrigerator, lights, etc.) one by one, measuring the current draw after each disconnection.
The component causing the drain will be the one that significantly reduces the current draw when disconnected.
- Common Culprits: Common culprits for parasitic drains include faulty interior lights, improperly installed electronics, or even a malfunctioning converter. Addressing these issues often involves replacing faulty components or ensuring proper installation.
Troubleshooting Flowchart
A visual guide can be helpful in systematically troubleshooting your battery switch problems.
- No Power: Check fuses -> Inspect connections for corrosion/loose wires -> Test battery voltage -> Replace switch if necessary.
- Incorrect Switching: Try switching multiple times -> Inspect switch mechanism -> Replace switch if necessary.
- Intermittent Power: Examine all wiring connections -> Replace faulty switch or connections.
- Battery Drain (Switch Off): Measure current draw -> Disconnect circuits systematically -> Identify and fix the parasitic drain.
Battery Switch and its Relation to Other Travel Trailer Systems: Battery Switch On Travel Trailer Function
Your battery switch is more than just an on/off switch; it’s a crucial component in managing your travel trailer’s power flow. Understanding its interaction with other systems is key to preventing problems and maximizing your RV’s functionality. This section details how the battery switch works in conjunction with other electrical systems, influencing charging, discharging, and overall performance.The battery switch acts as the central control point for your house batteries.
So, you’re an audiophile who travels? Awesome! Check out this guide on audiophile travel setups for tips on keeping your sound quality high on the go. It covers everything from portable DACs to noise-cancelling headphones. But if you need something a bit more rugged, maybe for a camping trip or a deployment, then you might want to look at this other resource on audiophile travel setups designed for durability and portability in tougher environments.
Remember, great sound doesn’t have to stay at home!
It determines which power sources charge your batteries and which systems draw power from them. Improper use can lead to unexpected issues, such as drained batteries or damage to sensitive electronics.
Interaction with Solar Panels and Inverters
Solar panels provide a clean and renewable energy source for your travel trailer. When your solar panels are generating power, that power typically flows to your battery bankthrough* the battery switch. If the switch is off, the solar panels won’t charge your batteries; instead, the power will likely be lost or diverted, depending on your system’s design. Similarly, inverters, which convert DC power from your batteries to AC power for household appliances, draw power directly from the batteries, and the battery switch controls whether they have access to that power.
With the switch in the “off” position, your inverter won’t function, regardless of your battery’s charge level. In short, the battery switch acts as a gatekeeper, controlling the flow of energy between solar panels, batteries, and inverters.
Impact on Battery Charging and Discharging
The position of your battery switch directly impacts how your batteries charge and discharge. With the switch turned to the “on” position, your batteries can be charged by your shore power (hookup to campground electricity), your alternator (when your tow vehicle is running), and your solar panels (if the system is properly configured). In the “off” position, charging is disabled.
Conversely, when the switch is “on”, appliances and devices draw power from the batteries. Turning the switch “off” prevents any drain on the batteries, preserving their charge. Incorrect usage, like leaving the switch on when not in use, can lead to fully discharged batteries and potentially damage to the batteries themselves.
Comparison with Other Battery Management Systems
While a simple battery switch offers basic on/off control, more sophisticated battery management systems (BMS) offer advanced features like charge control, voltage monitoring, and low-voltage disconnect protection. A BMS automatically manages the charging and discharging processes to protect your batteries from overcharging, deep discharging, and other potential problems. A simple switch lacks these safeguards, requiring the user to actively monitor battery levels and manage their use accordingly.
A BMS is essentially an automated, more intelligent version of a simple battery switch.
Effects of Incorrect Battery Switch Usage
Improper use of the battery switch can have several negative consequences. For instance, leaving the switch in the “on” position while the RV is stored for an extended period can lead to completely drained batteries, potentially causing permanent damage and requiring costly replacements. Similarly, turning the switch off while running appliances that draw power from the batteries will cause those appliances to cease functioning unexpectedly.
Incorrect switching can also lead to issues with charging; if the switch is off, your batteries won’t charge, regardless of whether shore power, a generator, or solar panels are available. Ultimately, consistent and correct use of the battery switch is essential for maintaining your travel trailer’s electrical systems and avoiding costly repairs.
Battery Switch Maintenance and Replacement
Regular maintenance of your travel trailer’s battery switch is crucial for ensuring reliable power and preventing costly repairs. Neglecting this simple task can lead to corrosion, poor connections, and ultimately, a failed switch. A well-maintained battery switch contributes to the longevity of your batteries and the overall electrical system of your RV.Proper maintenance and knowing how to replace the switch will save you time and money in the long run, ensuring uninterrupted power on your adventures.
This section details a routine maintenance schedule and a step-by-step guide for replacement.
Routine Battery Switch Maintenance, Battery switch on travel trailer function
A simple inspection and cleaning routine can significantly extend the life of your battery switch. This involves visually checking for corrosion, loose connections, and any signs of damage. Regular cleaning prevents buildup that can hinder conductivity and cause premature failure.
- Visual Inspection: At least twice a year, inspect the switch for corrosion on the terminals and the switch itself. Look for any signs of damage, such as cracks or loose components. Check all wire connections for tightness and corrosion.
- Cleaning: Use a wire brush to clean any corrosion from the terminals. A baking soda and water paste can also help remove stubborn corrosion. After cleaning, apply a dielectric grease to the terminals to prevent future corrosion.
- Tightening Connections: Ensure all wire connections are securely tightened. Over-tightening can damage the terminals, so use caution.
Replacing a Faulty Battery Switch
If your battery switch is malfunctioning—for example, if it fails to connect or disconnect properly, or shows signs of significant corrosion despite cleaning—replacement is necessary.
- Disconnect the Batteries: This is the most critical first step. Disconnect both the positive (+) and negative (-) terminals from your batteries to prevent accidental shocks or short circuits.
- Remove the Old Switch: Carefully remove any wires connected to the old switch, taking note of their positions. Use a wire brush to clean the mounting surface before installing the new switch.
- Install the New Switch: Mount the new switch securely to the mounting surface. Ensure the switch is correctly oriented. Connect the wires to the corresponding terminals on the new switch, matching their positions to the notes you took earlier.
- Reconnect the Batteries: Reconnect the positive (+) and negative (-) terminals to your batteries.
- Test the Switch: Thoroughly test the switch in all positions to ensure it’s functioning correctly. Check your trailer’s lights, appliances, and other electrical systems.
Selecting a Replacement Battery Switch
Choosing the right replacement battery switch is essential for compatibility and safety. The new switch should have the same amperage rating as the original and be compatible with the number of batteries in your system (e.g., a two-battery switch for a dual-battery setup).Consider the type of switch as well. Some switches offer features like a “battery disconnect” function for added safety.
Consult your travel trailer’s wiring diagram or the original switch’s specifications to ensure compatibility. If you’re unsure, seek advice from an RV technician.
Tools and Materials for Battery Switch Maintenance and Replacement
Before starting any work, gather the necessary tools and materials. This ensures a smooth and efficient process.
- Wire brush
- Baking soda
- Water
- Dielectric grease
- Screwdrivers (appropriate size for your switch)
- Replacement battery switch (matching amperage and number of batteries)
- Wrench (for battery terminals)
- Multimeter (optional, for testing the switch)
Mastering your travel trailer’s battery switch is a small investment of time that yields significant rewards in peace of mind and reliable power. By understanding the different types of switches, following safe operating procedures, and performing regular maintenance, you’ll ensure your RV is always ready for adventure. Remember, a properly maintained battery system is essential for a comfortable and enjoyable camping experience!
Q&A
What happens if I leave my battery switch on all the time?
Leaving your battery switch on constantly can drain your batteries, especially if you have parasitic draws (devices using power even when turned off). It’s best to turn it off when not using the trailer for extended periods.
How often should I check my battery connections?
Inspect your battery connections at least every three months for corrosion. Clean them with a wire brush and baking soda solution if needed.
My battery switch is stuck. What should I do?
Try using a lubricant like WD-40 on the switch mechanism. If that doesn’t work, you may need to replace the switch.
Can I use a different type of battery switch than what came with my trailer?
It’s generally best to use a replacement switch with the same amperage rating as the original. Consult your trailer’s manual or a qualified RV technician for guidance.
